CRUD operation using entity framework in .net core MVC application
In Previous article "Setup Code first approach in .net core MVC application using entity framework " we have discussed setting up the code first approach in .net core application. We have created our first model in the sample project and we will be using the same project in this article. In this article we will doing the CRUD operation using entity framework in .net core MVC application. Visual studio provides scaffolding template for these operation but we will not use the scaffolding template for the CRUD operation rather we use the manual custom code for understating of the subject better.
Lets start the implementation.
Before we start the crud operation activity we need to do some useful changes to entity migration. In previous article we have used the update-database command to migrate changes to database, but in real time web application this approach would not work so for that we need to make changes such that the migration changes will commit to database without any command from the code itself. for that we need to add following code in our project.
Create folder in project named "Extensions" and add "MigrationHelper" class as shown in the figure.
Add following code in that class. using Microsoft.AspNetCore.Builder;
using Microsoft.EntityFrameworkCore;
using Microsoft.Extensions.DependencyInjection;
namespace ModelsExample
{
public static class MigrationHelper
{
public static IApplicationBuilder MigrateDatabase(this IApplicationBuilder application)
{
using (var scope = application.ApplicationServices.CreateScope())
{
using (var context = scope.ServiceProvider.GetRequiredService<SampleDbContext>())
{
context.Database.Migrate();
}
}
return application;
}
}
}
Now call above extension method in "Configure" method of "Startup.cs" of the project as shown in below code.
   public void Configure(IApplicationBuilder app, IWebHostEnvironment env)
     {
       if (env.IsDevelopment())
       {
         app.UseDeveloperExceptionPage();
       }
       else
       {
         app.UseExceptionHandler("/Home/Error");
         // The default HSTS value is 30 days. You may want to change this for production scenarios, see https://aka.ms/aspnetcore-hsts.
         app.UseHsts();
       }
       app.MigrateDatabase();
       app.UseHttpsRedirection();
       app.UseStaticFiles();
       app.UseRouting();
       app.UseAuthorization();
       app.UseEndpoints(endpoints =>
       {
         endpoints.MapControllerRoute(
           name: "default",
           pattern: "{controller=Home}/{action=Index}/{id?}");
       });
     }
after adding above code sit back and relax, all the pending database migration will commit to database and no need to worry about your database migrations.
Now we are ready for our CRUD operation.
Add new project called "BusinessLayer" in the solution and create the folders "Defination" and "Implementation". In "Definition" folder add "EmployeeService" class and in "Implementation" folder add interface called "IEmployeeService" and add the code as per below sample.
In IEmployeeService interface add below code.
 using ModelsExample;
 using System.Collections.Generic;
 namespace BusinessLayer.Defination
 {
   public interface IEmployeeService
   {
     List<Employee> GetEmloyees();
     Employee GetEmloyee(int EmpId);
     bool SaveEmployee(Employee employee);
     bool UpdateEmployee(Employee employee);
     bool DeleteEmloyee(int EmpId);
   }
 }
In EmployeeService class add below code.
 using BusinessLayer.Defination;
 using ModelsExample;
 using System;
 using System.Collections.Generic;
 using System.Linq;
 namespace BusinessLayer.Implementation
 {
   public class EmployeeService: IEmployeeService
   {
     private readonly SampleDbContext dbContext;
     public EmployeeService(SampleDbContext sampleDbContext)
     {
       dbContext = sampleDbContext;
     }
     public bool DeleteEmloyee(int EmpId)
     {
       bool result = false;
       try
       {
         var emloyee = dbContext.Employees.Find(EmpId);
         dbContext.Employees.Remove(emloyee);
         dbContext.SaveChanges();
         result = true;
       }
       catch (Exception ex)
       {
         //Write logging code here
       }
       return result;
     }
     public Employee GetEmloyee(int EmpId)
     {
       return dbContext.Employees.Find(EmpId);
     }
     public List<Employee> GetEmloyees()
     {
       return dbContext.Employees.ToList();
     }
     public bool SaveEmployee(Employee employee)
     {
       bool result = false;
       try
       {
         dbContext.Employees.Add(employee);
         dbContext.SaveChanges();
         result = true;
       }
       catch(Exception ex)
       {
         //Write logging code here
       }
       return result;
     }
     public bool UpdateEmployee(Employee employee)
     {
       bool result = false;
       try
       {
         dbContext.Employees.Update(employee);
         dbContext.SaveChanges();
       }
       catch (Exception ex)
       {
         //Write logging code here
       }
       return result;
     }
   }
 }
If you can see in above code we have initialized the dbcontext object in constructor of the business service class. We have implemented the dbcontext in all the crud methods in EmployeeService class which is defined in the IEmployeeService interface.
Now we will have to add controller for CRUD operation named "EmployeeController" as shown below.
 using BusinessLayer.Defination;
 using Microsoft.AspNetCore.Mvc;
 using ModelsExample;
 using System;
 using System.Collections.Generic;
 using System.Linq;
 using System.Threading.Tasks;
 namespace Project_structiure_Example.Controllers
 {
   public class EmployeeController : Controller
   {
     private readonly IEmployeeService employee;
     public EmployeeController(IEmployeeService employeeService)
     {
       employee = employeeService;
     }
     public IActionResult Index()
     {
       var employees = employee.GetEmloyees();
       return View("EmployeeList",employees);
     }
     [HttpGet]
     public IActionResult SaveEmployee()
     {
       Employee employee = new Employee();
       return View(employee);
     }
     [HttpPost]
     public IActionResult SaveEmployee(Employee emp)
     {
       var result= employee.SaveEmployee(emp);
       if (result)
       {
         return RedirectToAction("Index");
       }
       else
       {
         ViewBag.Error = "unable to save record";
         return View("SaveEmployee", emp);
       }
     }
     [HttpGet]
     public IActionResult UpdateEmployee(int id)
     {
       var empl= employee.GetEmloyee(id);
       return View(empl);
     }
     [HttpPost]
     public IActionResult UpdateEmployee(Employee emp)
     {
       var result = employee.UpdateEmployee(emp);
       if (result)
       {
         return RedirectToAction("Index");
       }
       else
       {
         ViewBag.Error = "unable to update record";
         return View("UpdateEmployee", emp);
       }
     }
     [HttpGet]
     public IActionResult DeleteEmployee(int id)
     {
       var empl = employee.GetEmloyee(id);
       return View(empl);
     }
     [HttpPost]
     public IActionResult DeleteEmployee(int id,Employee emp)
     {
       var result = employee.DeleteEmloyee(id);
       if (result)
       {
         return RedirectToAction("Index");
       }
       else
       {
         ViewBag.Error = "unable to delete record";
         return View("DeleteEmployee", emp);
       }
     }
   }
 }
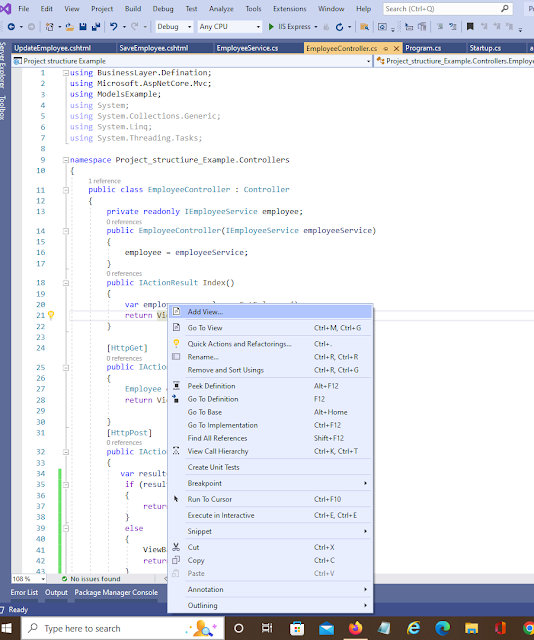
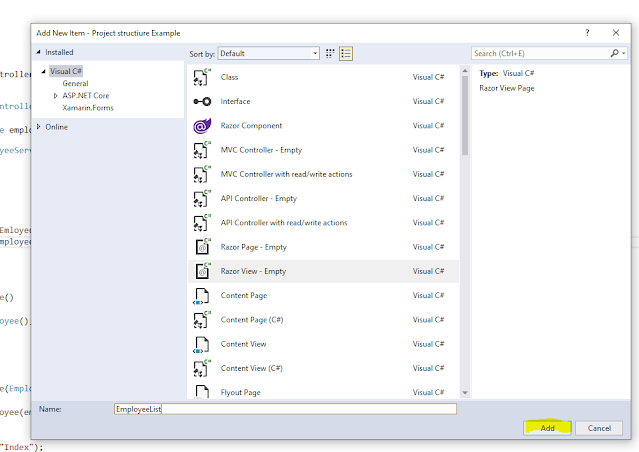
after adding action methods in above controller we need to add view for the actions, for that you need to right click on return view code block and click on Add view context menu then provide the view name for adding the view to the project as shown below.
similarly as per above way you can add the other views for your action.
Following are the view files of each action.
Action name Index() => EmployeeList.cshtml:
 @using ModelsExample
 @model IEnumerable<Employee>
 @{
 }
 <h1>Employee List</h1>
 @Html.ActionLink("Add Employee", "SaveEmployee")
 <br />
 <table cellpadding="2" cellspacing="2" border="1">
   <tr>
     <th>Employee Id</th>
     <th>Employee Name</th>
     <th>Address</th>
     <th>Edit</th>
     <th>Delete</th>
   </tr>
   @foreach (var item in Model)
   {
     <tr>
       <td>@item.Id</td>
       <th>@item.Name</th>
       <th>@item.Address</th>
       <th>@Html.ActionLink("Edit", "UpdateEmployee", new { id = item.Id })</th>
       <th>@Html.ActionLink("Delete", "DeleteEmployee", new { id = item.Id })</th>
     </tr>
   }
 </table>
In above view we have included list of employee model into model object and we have used the Model object in foreach to display the List of employee in tabular format. In view we can add the c# code by using @ key and bind it to the html code dynamically.
Action name SaveEmployee() => SaveEmployee.cshtml:
 @using ModelsExample
 @model Employee
 @{
 }
 @using (Html.BeginForm())
 {
   <h1>Enter employee Details</h1>
   <div>
     @Html.LabelFor(model => model.Name)
   </div>
   <div>
     @Html.TextBoxFor(model => model.Name)
   </div>
   <hr />
   <div>
     @Html.LabelFor(model => model.Address)
   </div>
   <div>
     @Html.TextAreaFor(model => model.Address)
   </div>
   <hr />
   <div>
     <input type="submit" value="Submit" />
   </div>
 }
In above view we have imported employee object into Model object and the maodel object we have used in controls i.e. TextBoxFor and LabelFor this way we can bind dattta automatically to controls and if user changes any value in Textbox then it also binds it automatically. on submit of form the values will be binded in SaveEmployee post action method of "EmployeeController".
   [HttpPost]
     public IActionResult SaveEmployee(Employee emp)
Action name UpdateEmployee() => UpdateEmployee.cshtml:
 @using ModelsExample
 @model Employee
 @{
 }
 @using (Html.BeginForm())
 {
   <h1>update employee Details</h1>
   <div>
     @Html.LabelFor(model => model.Name)
   </div>
   <div>
     @Html.TextBoxFor(model => model.Name)
   </div>
   <hr />
   <div>
     @Html.LabelFor(model => model.Address)
   </div>
   <div>
     @Html.TextAreaFor(model => model.Address)
   </div>
   <hr />
   <div>
     <input type="submit" value="Submit" /> @Html.ActionLink("Back", "Index")
   </div>
 }
In
above view we have imported employee object into Model object and the
model object we have used in controls i.e. TextBoxFor and LabelFor this
way we can bind data automatically to controls and if user changes
any value in Textbox then it also binds it automatically. on submit of
form the values will be binded in UpdateEmployee post action method of "EmployeeController".
    [HttpPost]
     public IActionResult UpdateEmployee(Employee emp)
Action name DeleteEmployee() => DeleteEmployee.cshtml:
 @using ModelsExample
 @model Employee
 @{
 }
 @using (Html.BeginForm())
 {
   <h1>Delete employee Details</h1>
   <div>
     @Html.LabelFor(model => model.Name)
   </div>
   <div>
     @Html.TextBoxFor(model => model.Name)
   </div>
   <hr />
   <div>
     @Html.LabelFor(model => model.Address)
   </div>
   <div>
     @Html.TextAreaFor(model => model.Address)
   </div>
   <hr />
   <div>
     <input type="submit" value="Submit" /> @Html.ActionLink("Back","Index")
   </div>
 }
In above view we have imported employee object into Model object and the model object we have used in controls i.e. TextBoxFor and LabelFor this way we can bind data automatically to controls and if user clicks on submit button as confirmation that he wants to delete record. on submit of form the values will be binded in DeleteEmployee post action method of "EmployeeController".
 [HttpPost]
     public IActionResult DeleteEmployee(int id,Employee emp)
Now only one thing is left that we need to add the hyperlink in the menu of project for that you need to modify the _layout.schtml file as whoen below.
<!DOCTYPE html>
<html lang="en">
<head>
<meta charset="utf-8" />
<meta name="viewport" content="width=device-width, initial-scale=1.0" />
<title>@ViewData["Title"] - Project_structure_Example</title>
<link rel="stylesheet" href="~/lib/bootstrap/dist/css/bootstrap.min.css" />
<link rel="stylesheet" href="~/css/site.css" />
</head>
<body>
<header>
<nav class="navbar navbar-expand-sm navbar-toggleable-sm navbar-light bg-white border-bottom box-shadow mb-3">
<div class="container">
<a class="navbar-brand" asp-area="" asp-controller="Home" asp-action="Index">Project_structiure_Example</a>
<button class="navbar-toggler" type="button" data-toggle="collapse" data-target=".navbar-collapse" aria-controls="navbarSupportedContent"
aria-expanded="false" aria-label="Toggle navigation">
<span class="navbar-toggler-icon"></span>
</button>
<div class="navbar-collapse collapse d-sm-inline-flex flex-sm-row-reverse">
<ul class="navbar-nav flex-grow-1">
<li class="nav-item">
<a class="nav-link text-dark" asp-area="" asp-controller="Home" asp-action="Index">Home</a>
</li>
<li class="nav-item">
<a class="nav-link text-dark" asp-area="" asp-controller="Employee" asp-action="Index">Employee</a>
</li>
<li class="nav-item">
<a class="nav-link text-dark" asp-area="" asp-controller="Home" asp-action="Privacy">Privacy</a>
</li>
</ul>
</div>
</div>
</nav>
</header>
<div class="container">
<main role="main" class="pb-3">
@RenderBody()
</main>
</div>
<footer class="border-top footer text-muted">
<div class="container">
© 2022 - Project_structiure_Example - <a asp-area="" asp-controller="Home" asp-action="Privacy">Privacy</a>
</div>
</footer>
<script src="~/lib/jquery/dist/jquery.min.js"></script>
<script src="~/lib/bootstrap/dist/js/bootstrap.bundle.min.js"></script>
<script src="~/js/site.js" asp-append-version="true"></script>
@RenderSection("Scripts", required: false)
</body>
</html>
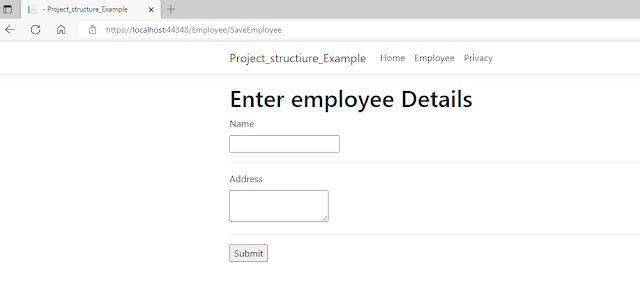
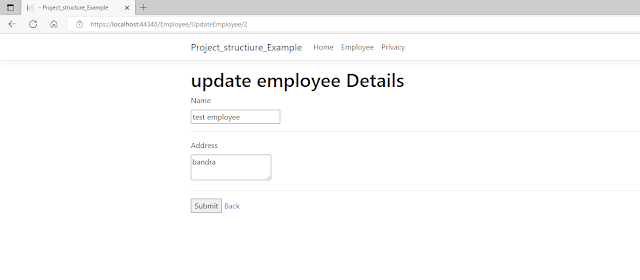
that's it we have done our initial coding part now you can test your code by running the project and you will get following output as shown below.
Employee List :
Add employee Screen:
Edit Employee:
Delete Employee:
Thank you.


Comments
Post a Comment