Setup Code first approach in .net core MVC application using entity framework
In Previous article ".Net core MVC project structure explained step by step part 2" we have discussed about .Net core MVC project structure. In this article we will be setting up the code first approach in .net core application. To control and manage the entities we can opt for code first approach to design our database structure. To setup the entity framework in .net core app we need to add following nuget package to our projects.
- Microsoft.EntityFrameworkCore
- Microsoft.EntityFrameworkCore.Relational
- Microsoft.EntityFrameworkCore.SqlServer
- Microsoft.EntityFrameworkCore.Tools
- Microsoft.EntityFrameworkCore.Design
I will show you how and where you need to use the above packages to setup the complete structure.
I will use the same solution which i have used in previous article to setup the code first approach.
Lets start the implementation.
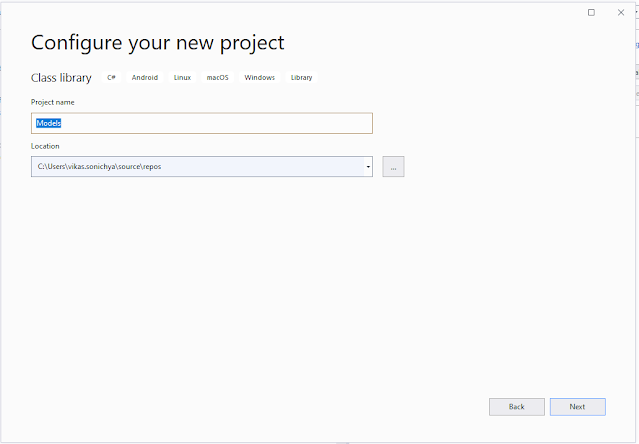
- Go to solution explorer and right click on solution then click on new project then create the class library project and name it as Models as shown below screen.
- right click on Models project and click on manage nuget package and add below nuget packages.
- Microsoft.EntityFrameworkCore
- Microsoft.EntityFrameworkCore.Relational
- Microsoft.EntityFrameworkCore.SqlServer
- Microsoft.EntityFrameworkCore.Tools
- Right click on Models project and click on add class and name it "Employee" and create the properties as sown below. Best practice is to create the folder entities and add the models inside the folder but we are adding the class directly.
 using System;
 using System.ComponentModel.DataAnnotations;
 using System.ComponentModel.DataAnnotations.Schema;
 namespace Models
 {
   [Table("Employee")]
   public class Employee
   {
     [Column("Id")]
     public int Id { get; set; }
     [Column("Name")]
     [MaxLength(200)]
     public string Name { get; set; }
     [Column("Address")]
     [MaxLength(700)]
     public string Address { get; set; }
     [Column("MobileNo")]
     [MaxLength(10)]
     public string MobileNo { get; set; }
   }
 }
- Right click on Models project and click on add class and name it "SampleDbContext" and create the properties as sown below.
 using Microsoft.EntityFrameworkCore;
 namespace Models
 {
   public class SampleDbContext:DbContext
   {
     public SampleDbContext(DbContextOptions options):base(options)
     {
     }
     public DbSet<Employee> Employees{ get; set; }
   }
 }
- Now Model project setup with entity is done now we will configure the dbcontext in our MVC application.
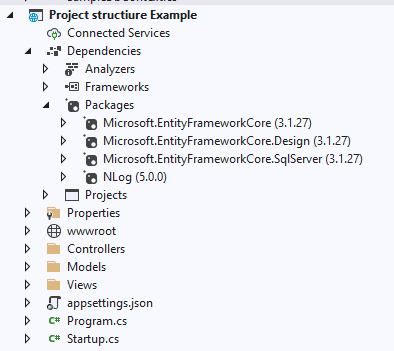
- Now right click on project structure sample and click on manage nuget package and add below nuget packages.
- Microsoft.EntityFrameworkCore
- Microsoft.EntityFrameworkCore.SqlServer
- Microsoft.EntityFrameworkCore.Design
- Now go to appsetting.json file and add the connection string details as shown below.
 {
  "ConnectionStrings": {
   "connection": "Data Source=DESKTOP-IA0LSSV\\SQLEXPRESS;Initial Catalog=sampleDatabase;Integrated Security=true"
  },
  "Logging": {
   "LogLevel": {
    "Default": "Information",
    "Microsoft": "Warning",
    "Microsoft.Hosting.Lifetime": "Information"
   }
  },
  "AllowedHosts": "*"
 }
- Now go to startup file and add below code in it to configure the dbcontext class.
 using Microsoft.AspNetCore.Builder;
 using Microsoft.AspNetCore.Hosting;
 using Microsoft.EntityFrameworkCore;
 using Microsoft.Extensions.Configuration;
 using Microsoft.Extensions.DependencyInjection;
 using Microsoft.Extensions.Hosting;
 using Models;
 namespace Project_structiure_Example
 {
   public class Startup
   {
     public Startup(IConfiguration configuration)
     {
       Configuration = configuration;
     }
     public IConfiguration Configuration { get; }
     // This method gets called by the runtime. Use this method to add services to the container.
     public void ConfigureServices(IServiceCollection services)
     {
       services.AddControllersWithViews();
       services.AddDbContext<SampleDbContext>(obj => obj.UseSqlServer(Configuration["ConnectionStrings:connection"]));
     }
     // This method gets called by the runtime. Use this method to configure the HTTP request pipeline.
     public void Configure(IApplicationBuilder app, IWebHostEnvironment env)
     {
       if (env.IsDevelopment())
       {
         app.UseDeveloperExceptionPage();
       }
       else
       {
         app.UseExceptionHandler("/Home/Error");
         // The default HSTS value is 30 days. You may want to change this for production scenarios, see https://aka.ms/aspnetcore-hsts.
         app.UseHsts();
       }
       app.UseHttpsRedirection();
       app.UseStaticFiles();
       app.UseRouting();
       app.UseAuthorization();
       app.UseEndpoints(endpoints =>
       {
         endpoints.MapControllerRoute(
           name: "default",
           pattern: "{controller=Home}/{action=Index}/{id?}");
       });
     }
   }
 }
- Now we have created our first models and we have also configured the dbcontext, its time to create the migration in order to create the database in the sql server db.
- go to view and other windows option and then click on the package manager console as shown below.
- Now type below command in package manager console.
add-migration "EmployeeTableCreation"
after executing above command it will automatically generates the migration file for the new table called "employee" as shown below.
- Now we need to apply this migration to our db in this case entity framework will create a new database since the database is not created yet and going forward all other changes in our entities will going to update in the same db.
for that you need to fire below command in package manager console.
update-database
Now after executing above command the entity framework will create the database along with new table as shown in below figure.
We have applied all the changes of the migration file to db using command however this can be done with code also by creating the dbcontext object and call the Migrate method.
You can also observe that the table named "__EFMigrationsHistory" is also created along with the "employee" table. This table is automatically created by entity framework for maintaining the applied migration to database and whenever new migration files created then it will apply those migration in the database on calling of Migrate method of dbcontext instance or update database command in package manager console.
That's it we have successfully setup the code first approach in .net core mvc application.
What next? -we will be take a look on how we can use entities for storing, fetching data in application.


Comments
Post a Comment