Custom Validation and Class Level validation using Data Annotation in MVC .Net core application
In Previous article i have demonstrated about "Validations using entity framework data annotation in .Net core MVC" where i have implemented ready made validation types in MVC application. In this article i will be demonstrating about custom validation and class level validation using Data Annotation in MVC .Net core application. The custom validation will be very useful when we need to solve real time scenario where the ready made validation will not work. I also going to show about the class level validation which is also a type of custom kind validation available in data annotation using entity framework.
Lets start the implementation, I going to use the same application which i have used in previous article.
First we need to add few columns in existing employee table for validation demonstration as below.
- DateOfBirth
- DateOfJoin
- DateOfExit
After adding above fields my model class will look like below
 using ModelsExample.Attributes;
 using System;
 using System.Collections.Generic;
 using System.ComponentModel.DataAnnotations;
 using System.ComponentModel.DataAnnotations.Schema;
 namespace ModelsExample
 {
   [Table("EmployeeMaster")]
   public class Employee:IValidatableObject
   {
     [Column("Id")]
     public int Id { get; set; }
     [Column("Name")]
     [Required(ErrorMessage = "Please enter Name")]
     [MaxLength(25,ErrorMessage ="Maximum 25 characters allowed")]
     [RegularExpression(@"^[a-zA-Z0-9]{4,10}$",ErrorMessage ="Special characters not allowed in Name")]
     public string Name { get; set; }
     [Column("Address")]
     [Required(ErrorMessage = "Please enter Address")]
     [StringLength(200, ErrorMessage ="{0} length must be between {2} and {1}",MinimumLength =6)]
     public string Address { get; set; }
     [Column("CityId")]
     [Required(ErrorMessage = "Please Select City")]
     public int CityId { get; set; }
     [Column("StateId")]
     [Required(ErrorMessage = "Please Select State")]
     public int StateId { get; set; }
     [Column("DateOfBirth")]
     [Required(ErrorMessage = "Please enter Date of Birth")]
     public DateTime DateOfBirth { get; set; }
     [Column("DateOfJoin")]
     [Required(ErrorMessage = "Please enter Date of Join")]
     public DateTime DateOfJoin { get; set; }
     [Column("DateOfExit")]
     public DateTime? DateOfExit { get; set; }
   }
 }
after adding below field i need to execute below migration command in package manager console window
add-migration "AddedDateFieldsInEmployeeMaster"
Once executing above command migration below file got generated.
 using System;
 using Microsoft.EntityFrameworkCore.Migrations;
 namespace ModelsExample.Migrations
 {
   public partial class AddedDateFieldsInEmployeeMaster : Migration
   {
     protected override void Up(MigrationBuilder migrationBuilder)
     {
       migrationBuilder.AlterColumn<string>(
         name: "Name",
         table: "EmployeeMaster",
         maxLength: 25,
         nullable: false,
         oldClrType: typeof(string),
         oldType: "nvarchar(max)",
         oldNullable: true);
       migrationBuilder.AlterColumn<string>(
         name: "Address",
         table: "EmployeeMaster",
         maxLength: 200,
         nullable: false,
         oldClrType: typeof(string),
         oldType: "nvarchar(max)",
         oldNullable: true);
       migrationBuilder.AddColumn<DateTime>(
         name: "DateOfBirth",
         table: "EmployeeMaster",
         nullable: false,
         defaultValue: new DateTime(1, 1, 1, 0, 0, 0, 0, DateTimeKind.Unspecified));
       migrationBuilder.AddColumn<DateTime>(
         name: "DateOfExit",
         table: "EmployeeMaster",
         nullable: true);
       migrationBuilder.AddColumn<DateTime>(
         name: "DateOfJoin",
         table: "EmployeeMaster",
         nullable: false,
         defaultValue: new DateTime(1, 1, 1, 0, 0, 0, 0, DateTimeKind.Unspecified));
     }
     protected override void Down(MigrationBuilder migrationBuilder)
     {
       migrationBuilder.DropColumn(
         name: "DateOfBirth",
         table: "EmployeeMaster");
       migrationBuilder.DropColumn(
         name: "DateOfExit",
         table: "EmployeeMaster");
       migrationBuilder.DropColumn(
         name: "DateOfJoin",
         table: "EmployeeMaster");
       migrationBuilder.AlterColumn<string>(
         name: "Name",
         table: "EmployeeMaster",
         type: "nvarchar(max)",
         nullable: true,
         oldClrType: typeof(string),
         oldMaxLength: 25);
       migrationBuilder.AlterColumn<string>(
         name: "Address",
         table: "EmployeeMaster",
         type: "nvarchar(max)",
         nullable: true,
         oldClrType: typeof(string),
         oldMaxLength: 200);
     }
   }
 }
Once running the application the columns will be created by auto-migration code which i had explained in my previous article.
Custom Validation Using Attributes:
so now lets move to create custom migration attribute class for our custom validation.
First we need to create the Attributes folder in ModelExample Project and inside the attributes folder add class named "EmployeeAgeCompliance.cs" and add below code in that.
 using System;
 using System.Collections.Generic;
 using System.ComponentModel.DataAnnotations;
 using System.Text;
 namespace ModelsExample.Attributes
 {
   public class EmployeeAgeCompliance:ValidationAttribute
   {
     protected override ValidationResult IsValid(object value, ValidationContext validationContext)
     {
       DateTime dob = Convert.ToDateTime(value);
       if (DateTime.Now.Subtract(dob).TotalDays < 6570)
       {
         return new ValidationResult("The given date of birth is not complient and empoloyee is not 18 years completed");
       }
       return ValidationResult.Success;
     }
   }
 }
In above code we have checked that the the employee age should be more than or equal to 18 years other wise the user will get the validation message in return statement. Now we have created the attribute now its time to use this attribute in the model as per below highlighted code.
 using ModelsExample.Attributes;
 using System;
 using System.Collections.Generic;
 using System.ComponentModel.DataAnnotations;
 using System.ComponentModel.DataAnnotations.Schema;
 namespace ModelsExample
 {
   [Table("EmployeeMaster")]
   public class Employee:IValidatableObject
   {
     [Column("Id")]
     public int Id { get; set; }
     [Column("Name")]
     [Required(ErrorMessage = "Please enter Name")]
     [MaxLength(25,ErrorMessage ="Maximum 25 characters allowed")]
     [RegularExpression(@"^[a-zA-Z0-9]{4,10}$",ErrorMessage ="Special characters not allowed in Name")]
     public string Name { get; set; }
     [Column("Address")]
     [Required(ErrorMessage = "Please enter Address")]
     [StringLength(200, ErrorMessage ="{0} length must be between {2} and {1}",MinimumLength =6)]
     public string Address { get; set; }
     [Column("CityId")]
     [Required(ErrorMessage = "Please Select City")]
     public int CityId { get; set; }
     [Column("StateId")]
     [Required(ErrorMessage = "Please Select State")]
     public int StateId { get; set; }
     [Column("DateOfBirth")]
     [EmployeeAgeCompliance()]
     [Required(ErrorMessage = "Please enter Date of Birth")]
     public DateTime DateOfBirth { get; set; }
     [Column("DateOfJoin")]
     [Required(ErrorMessage = "Please enter Date of Join")]
     public DateTime DateOfJoin { get; set; }
     [Column("DateOfExit")]
     public DateTime? DateOfExit { get; set; }
   }
 }
Next we have add new fields added in our view so that user can put input and we can test our validation.
Below is our modified SaveEmployee.Chtml file with highlighted text.
 @*
   For more information on enabling MVC for empty projects, visit https://go.microsoft.com/fwlink/?LinkID=397860
 *@
 @using ModelsExample
 @model Employee
 @{
 }
 @section Scripts
 {
   @Html.Partial("_ValidationScriptsPartial")
   <script type="text/javascript">
     $(document).ready(function () {
       $("#StateId").change(function () {
         var stateId = $(this).val();
         $.get("/MasterData/GetCity?StateId=" + stateId, function (data) {
           var city = $("#CityId");
           city.html('');
           city.append($("<option/>", { value: "", text: "Select" }));
           if (data && data.length > 0) {
             $.each(data, function (index, item) {
               city.append($("<option/>", { value: item.id, text: item.name }));
             });
           }
         });
       });
       $.each($("input"), function (n, e) {
         e.value = e.value.replace("01-01-0001 00:00:00", "");
       });
     });
   </script>
   <style type="text/css">
     .field-validation-error {
       color: red;
       font-weight: bold;
     }
   </style>
 }
 @using (Html.BeginForm())
 {
   <h1>Enter Employee Details</h1>
   <div>
     @Html.LabelFor(model => model.Name)
   </div>
   <div>
     @Html.TextBoxFor(model => model.Name)
     @Html.ValidationMessageFor(model => model.Name)
   </div>
   <div>
     @Html.LabelFor(model => model.Address)
   </div>
   <div>
     @Html.TextBoxFor(model => model.Address)
     @Html.ValidationMessageFor(model => model.Address)
   </div>
   <div>
     @Html.LabelFor(model => model.StateId)
   </div>
   <div>
     @Html.DropDownListFor(model => model.StateId, new SelectList(ViewBag.StateMaster, "Id", "Name", 0), "Select")
     @Html.ValidationMessageFor(model => model.StateId)
   </div>
   <div>
     @Html.LabelFor(model => model.CityId)
   </div>
   <div>
     @Html.DropDownListFor(model => model.CityId, new SelectList(ViewBag.CityMaster??Enumerable.Empty<SelectListItem>(), "Id", "Name", 0), "Select")
     @Html.ValidationMessageFor(model => model.CityId)
   </div>
   <div>
     @Html.LabelFor(model => model.DateOfBirth)
   </div>
   <div>
     @Html.TextBoxFor(model => model.DateOfBirth)
     @Html.ValidationMessageFor(model => model.DateOfBirth)
   </div>
   <div>
     @Html.LabelFor(model => model.DateOfJoin)
   </div>
   <div>
     @Html.TextBoxFor(model => model.DateOfJoin)
     @Html.ValidationMessageFor(model => model.DateOfJoin)
   </div>
   <div>
     @Html.LabelFor(model => model.DateOfExit)
   </div>
   <div>
     @Html.TextBoxFor(model => model.DateOfExit)
     @Html.ValidationMessageFor(model => model.DateOfExit)
   </div>
   <hr />
   <div>
     <input type="submit" value="Submit" /> @Html.ActionLink("Back to employees", "Index")
   </div>
 }
Now we need to modify our employee controller file to check for "ModelState.IsValid" property when user submits the form id the "ModelState.IsValid" is true then only we need to save the data to db else we will return the same view with model object like below code.
 using BusinessLayerExample.Definition;
 using Microsoft.AspNetCore.Mvc;
 using ModelsExample;
 namespace Project_structiure_Example.Controllers
 {
   public class EmployeeController : Controller
   {
     public readonly IEmployeeService employeeService;
     public readonly IMasterService masterService;
     public EmployeeController(IEmployeeService employeeServiceObj,IMasterService masterService)
     {
       employeeService = employeeServiceObj;
       this.masterService = masterService;
     }
     public IActionResult Index()
     {
       var employees = employeeService.GetEmplyees();
       return View(employees);
     }
     [HttpGet]
     public IActionResult SaveEmployee()
     {
       ViewBag.StateMaster= masterService.GetStateMaster();
       return View(new Employee());
     }
     [HttpPost]
     public IActionResult SaveEmployee(Employee employee)
     {
       bool result = false;
       if (ModelState.IsValid)
       {
         result = employeeService.SaveEmployee(employee);
       }
       if(result)
       {
         return RedirectToAction("Index");
       }
       else
       {
         ViewBag.StateMaster = masterService.GetStateMaster();
         ViewBag.CityMaster = masterService.GetCityMaster(employee.StateId);
         return View(employee);
       }
     }
     [HttpGet]
     public IActionResult UpdateEmployee(int id)
     {
       var employee = employeeService.GetEmplyees(id);
       return View(employee);
     }
     [HttpPost]
     public IActionResult UpdateEmployee(Employee employee)
     {
       bool result = false; ;
       if (ModelState.IsValid)
       {
          result = employeeService.UpdateEmployee(employee);
       }
       if (result)
       {
         return RedirectToAction("Index");
       }
       else
       {
         ViewBag.StateMaster = masterService.GetStateMaster();
         ViewBag.CityMaster = masterService.GetCityMaster(employee.StateId);
         return View(employee);
       }
     }
     [HttpGet]
     public IActionResult DeleteEmployee(int id)
     {
       var employee = employeeService.GetEmplyees(id);
       return View(employee);
     }
     [HttpPost]
     public IActionResult DeleteEmployee(int id,Employee emp)
     {
       var result = employeeService.DeleteEmployee(id);
       if (result)
       {
         return RedirectToAction("Index");
       }
       else
       {
         return View(emp);
       }
     }
   }
 }
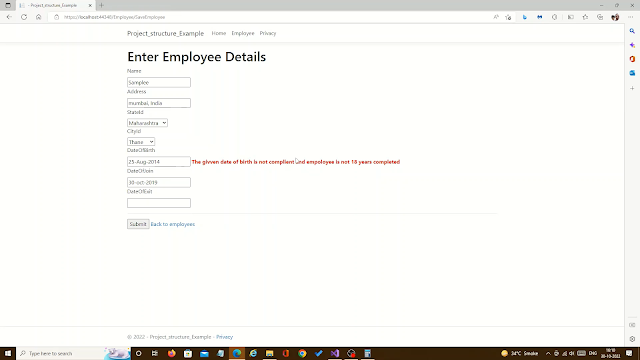
Now this custom validation code is done lets run the application and check for output as below.
in above image you can see that the validation is showing if user put date which is not satisfying the condition of 18 years.
Class level validation:
I have shown custom validation using attributes now we can have look in class level validation technique. In class level validation we need to implement IValidatableObject interface to our model class in our case it is Employee model. like below highlighted code.
 using ModelsExample.Attributes;
 using System;
 using System.Collections.Generic;
 using System.ComponentModel.DataAnnotations;
 using System.ComponentModel.DataAnnotations.Schema;
 namespace ModelsExample
 {
   [Table("EmployeeMaster")]
   public class Employee:IValidatableObject
   {
     [Column("Id")]
     public int Id { get; set; }
     [Column("Name")]
     [Required(ErrorMessage = "Please enter Name")]
     [MaxLength(25,ErrorMessage ="Maximum 25 characters allowed")]
     [RegularExpression(@"^[a-zA-Z0-9]{4,10}$",ErrorMessage ="Special characters not allowed in Name")]
     public string Name { get; set; }
     [Column("Address")]
     [Required(ErrorMessage = "Please enter Address")]
     [StringLength(200, ErrorMessage ="{0} length must be between {2} and {1}",MinimumLength =6)]
     public string Address { get; set; }
     [Column("CityId")]
     [Required(ErrorMessage = "Please Select City")]
     public int CityId { get; set; }
     [Column("StateId")]
     [Required(ErrorMessage = "Please Select State")]
     public int StateId { get; set; }
     [Column("DateOfBirth")]
     [EmployeeAgeCompliance()]
     [Required(ErrorMessage = "Please enter Date of Birth")]
     public DateTime DateOfBirth { get; set; }
     [Column("DateOfJoin")]
     [Required(ErrorMessage = "Please enter Date of Join")]
     public DateTime DateOfJoin { get; set; }
     [Column("DateOfExit")]
     public DateTime? DateOfExit { get; set; }
     public IEnumerable<ValidationResult> Validate(ValidationContext validationContext)
     {
       List<ValidationResult> validationResults = new List<ValidationResult>();
       if(DateOfJoin>DateOfExit)
       {
         validationResults.Add(new ValidationResult("date of exit should be greater than date of join", new string[] { nameof(DateOfExit) }));
       }
       return validationResults;
     }
   }
 }
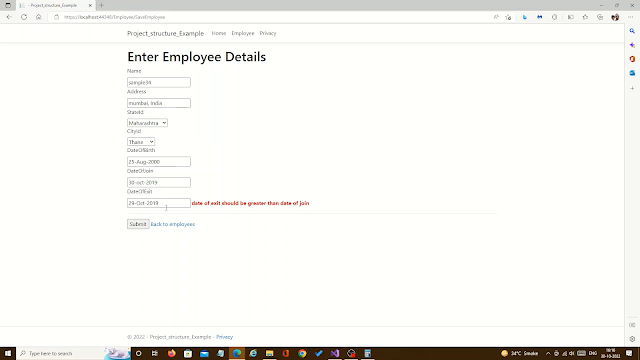
In above code we have checked dateofexit should not be less than join date if user puts the same scenario then user will get the message mentioned in validationresult class custructer and second parameter of validationresult will be for implementing this validation on which field. Like this you can put n number of validation in this method and add the validationresult object to validationResults List object and then finally return it.We have added the the validation now lets check the output for the class level validation.
Like above approch you can easily implement the custom validation in your MVC .net core application.


Unquestionably generally speaking very intriguing post. I was looking for Dot net Coaching and totally savored the experience of examining this one. Keep on posting. A responsibility of appreciation is all together for sharing.
ReplyDelete