Integrate ChatGPT OpenAI API in .NET Core Console Application from scratch.
In this Article I am going to demonstrate the integration of ChatGPT OpenAI API in .NET Core Console Application from scratch step by step.
Using ChatGPT API we can integrate the AI in our application just we need to call the API with the help of generating the secret key in ChatGPT developer page following is the steps to generate the secret key with screenshots.
- You need to login with the ChatGPT credentials before generating the Secret Key.
- On right corner of the page, click on personal icon and then click on View Api Key link
- On API Keys page click on +Create new secret key button
- Then type your desired API key name and then click on Create secret key button
- Your API key will be generated then click on copy button to copy the key and save it safely.
- Congratulation!!! your API key is created for use in console application.
Now we have the secret key with us then we can now move to ChatGPT page and get the code for the integration with console application from ChatGPT itself by providing the prompt.
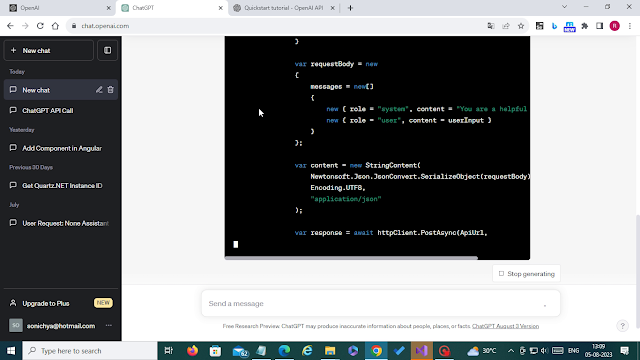
Now we will enter following prompt in ChatGPT text field "provide code to call api of chatgpt with input some text and print output in c# console application" as shown in below screenshot.
You can get the below output as per screenshot where ChatGPT provided the code necessary for integrating the ChatGPT api with console application with explanation.
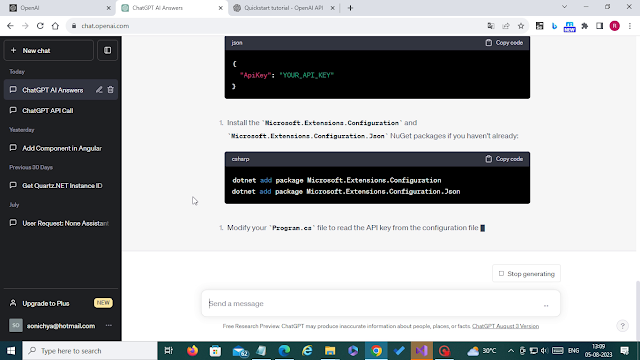
Now in the code the API key is stored directly to the global variable which not the best practice so we will ask ChatGPT to correct the program with entering the prompt like "please modify above code to get API key from config file" and then ChatGPT will provide the program with correction as shown below figure.
So now we have the key with us and code as well which is generated by the ChatGPT, now we can use the generated code in new console application and test it. You need to add dependencies in console application to run this code that i will keep to you and below is the screenshot for the same.
Following is the complete sample of final code which can work with the ChatGPT API in console application.
 using Microsoft.Extensions.Configuration;
 using System;
 using System.IO;
 using System.Net.Http;
 using System.Text;
 using System.Threading.Tasks;
 namespace Chat_GPT_Api_APP
 {
   class Program
   {
     private const string ApiUrl = "https://api.openai.com/v1/chat/completions";
     static async Task Main(string[] args)
     {
       Console.WriteLine("ChatGPT Console Application");
       IConfiguration configuration = new ConfigurationBuilder()
         .SetBasePath(Directory.GetCurrentDirectory())
         .AddJsonFile("appsetting.json", optional: false, reloadOnChange: true)
         .Build();
       string ApiKey = configuration["ApiKey"];
       Console.WriteLine("ChatGPT Console Application");
       using (var httpClient = new HttpClient())
       {
         httpClient.DefaultRequestHeaders.Add("Authorization", $"Bearer {ApiKey}");
         while (true)
         {
           Console.Write("You: ");
           string userInput = Console.ReadLine();
           if (string.IsNullOrWhiteSpace(userInput))
           {
             Console.WriteLine("Please enter a valid input.");
             continue;
           }
           var requestBody = new
           {
             messages = new[]
             {
             new { role = "system", content = "You are a helpful assistant." },
             new { role = "user", content = userInput }
           },
             model = "gpt-3.5-turbo",
             temperature = 0
           };
           var content = new StringContent(
             Newtonsoft.Json.JsonConvert.SerializeObject(requestBody),
             Encoding.UTF8,
             "application/json"
           );
           var response = await httpClient.PostAsync(ApiUrl, content);
           var responseContent = await response.Content.ReadAsStringAsync();
           if (response.IsSuccessStatusCode)
           {
             dynamic jsonResponse = Newtonsoft.Json.JsonConvert.DeserializeObject(responseContent);
             string assistantResponse = jsonResponse.choices[0].message.content;
             Console.WriteLine($"ChatGPT: {assistantResponse}");
           }
           else
           {
             Console.WriteLine("Error: Unable to process the request.");
             Console.WriteLine($"Response: {responseContent}");
           }
         }
       }
     }
   }
 }
Following is the output of the ChatGPT API call in console application.
So this is the way we can easily integrate the ChatGPT OpenAI api in .Net Core console application.
Thank you for reading and keep learning,


Comments
Post a Comment